The next time you find yourself in an older part of a city such as Boston, Philadelphia, London, or Rome, take a moment to look down at the sidewalks and streets. Most likely, they’re paved with clay bricks that have been in place for more than a century, withstanding foot and vehicle traffic, sun, rain, revolutions, and parades. They show their age—their edges are rounded, their faces worn smooth—but they’ve stood the test of time. Made from clay and/or shale, brick pavers are fired in a kiln at higher temperatures than wall or chimney bricks. As a result, they’re stronger and better able to withstand heavy loads. The heat also changes the pavers’ texture in a process known as vitrification, making them nonporous, so they don’t take on water. Because they are always installed flat—to line walkways, front entries, patios, and driveways—these bricks are solid, too, with no holes in their bodies to lighten their mass and allow mortar to lock them together.
How to Lay a Brick Paver Walkway
A paving brick’s color, from brownish red to earthy tan to deep purple, varies depending on the mineral content of the clay or shale used, and a range of surface treatments can be applied. Unlike products made with concrete, paving bricks’ naturally derived color doesn’t change substantially with the effects of time and the elements. “Brick pavers age much more gracefully than concrete pavers,” says Chris Meyers, president of Mack Brick Company, a masonry supplier in Enfield, CT. “The sun will never fade a brick paver.” Most installations call for the classic 4-by-8-inch brick; its dimensions, exactly twice as long as it is wide, meaning it’s easily laid in countless decorative patterns, including ever-popular basketweaves and herringbones. Whatever type of outdoor project you’re considering, here’s what you need to know about choosing and using this traditional masonry material.
Vitals
What do they cost?
Paver bricks cost an average of $2.25 to $6 per square foot uninstalled; if they’re handmade or have a specialty finish such as tumbling or distressing, the cost can be $7.50 or more per square foot.
How long do they last?
The brick industry offers a conservative estimate of 40 years, but brick-paver sidewalks in colonial-era cities have been in service under constant traffic for nearly 150 years. Because brick pavers are impervious to most types of damage, warranties range from 20 to 100 years—to none at all.
Where to buy them?
A local masonry supplier will have the best selection and prices as well as knowledgeable staff. Some home centers carry a small selection of brick pavers. They are usually sold by the pallet, which may cover 50 to 120 square feet, depending on the type of brick. Due to high shipping costs, homeowners typically don’t shop for brick pavers online, but there are exceptions; Gavin Historical Bricks sells antique pavers at historical bricks.com; shipping generally costs $8 to $10 per square foot, and customers must arrange for their own forklift to off-load them.
DIY or hire out?
Smaller projects like dry-laid brick walkways or patios are well within the reach of many homeowners, but larger jobs or those involving mortared brickwork are best left to a pro. Depending on the scope of work and where you live, expect to pay from $10 to 30 per square foot, including materials.
Are Brick Pavers Right For You?
Consider these pros and cons before heading to your local brickyard
Pros of brick pavers
Durable: The majority of brick pavers sold in the U.S. meet industry standards for compressive strength, resistance to cracking and abrasion, and minimal water absorption. Brick pavers rated for heavy vehicular traffic, for example, have a minimum compressive strength of 10,000 psi—the same as Belgian block. Easy care: Brick pavers need no special upkeep—just scrub them with a stiff-bristled brush and a mild detergent as needed to remove moss, algae, and stains. And because they don’t fade, they don’t need to be sealed, either. Any chipped or broken bricks—often the result of a faulty installation—can be individually replaced. Eco-friendly: Compared with other building materials such as concrete and manufactured stone, making brick consumes less energy and produces fewer emissions. Bricks also have a long life cycle—they can easily last a century or more—and are frequently reclaimed and reused.
Cons of brick pavers
Pricey: On average, brick pavers cost 15 to 20 percent more than concrete pavers. That translates to about $320 to $430 more in materials to build an average-size patio. Fewer shapes: Although they’re available in a range of earth tones, brick pavers come in only a few sizes and even fewer shapes—mostly rectangles and squares. Concrete pavers, in contrast, are offered in a wide array of colors, textures, and geometric shapes. Weeds are a nuisance: Many brick-paver projects are laid in sand, and weeds are a common sight in the joints between pavers. They’re less of an issue when pavers are set in mortar, but they can work their way through even the tiniest cracks—and when that happens, the mortar makes it more difficult to remove them.
How Brick Pavers are Made
All bricks start out as clay and/or shale mixed with water to a dough-like consistency. From there, differences emerge
Extruded bricks
Also known as wire-cut, are the most common. They’re made by forcing material through a rectangular die to create a block that’s then sliced into individual bricks. Typically, wire-cut bricks have a smooth texture and sharply defined edges. They are kiln-fired at temperatures between 1,700°F and 2,000°F, have high compressive strength, and are suitable for both pedestrian and heavy vehicle traffic.
Molded bricks
These are made using an older process. A looser clay mixture is pushed into molds and typically fired at a lower temperature than that of extruded bricks—usually around 1,600°F. The most common type, sand-struck bricks, are made by first coating the molds with sand. When fired, the sand fuses to the sides of the bricks, creating unique colors and textures. Water-struck bricks are also available; these are made primarily in New England from dense alluvial clay, which is sourced locally, and the molds are sprayed with water instead of sand. Homeowners who choose molded bricks value their rustic look and gently rounded corners. The pavers have a slightly lower compressive strength than extruded pavers but are appropriate for pedestrian and light vehicle traffic.
Brick Paver Colors
Brick pavers aren’t limited to orangey reds. They also come in colors like cream, salmon, gray, purple, burgundy, and brown—determined by the mineral content of the raw material and proprietary formulas developed to achieve certain looks. “To get a buff color, we mix more clay into the shale,” says Doug Rose of Pine Hall Brick. “Adding manganese creates dark brown.” In addition, the way they’re kiln-fired—known as the flash pattern—also affects color. Quick bursts of very high heat result in dark-red tones, while lower, slower flashes create softer mauves and terra-cottas, Rose says.
Tips for Shopping for Brick Pavers
ASTM standards: Most pavers on the market do, but it’s worth checking; this ensures it will stand up to wear and tear. The highest-quality pavers don’t just meet those standards; they exceed them. Buy the right size for the job: Classic 4-by-8-inch bricks are versatile and affordable, but pavers also come in 8-by-8-inch squares and larger 4-by-12-inch bricks. They range in thickness from 11/4 to 23/4 inches; the thickest pavers are recommended for heavy-use driveways. Many manufacturers also offer veneer brick pavers, a.k.a. “thin brick,” which gets mortared into place over concrete and works well on front steps. Decide on an edge treatment: Pavers with square edges create a clean, uniform surface, but they’re prone to chipping during installation. Beveled-edge pavers are much less likely to chip but have a manufactured look. To evoke a historical installation, choose a paver with irregular, slightly rounded edges, such as a molded paver or one that’s been tumbled. Some pavers come with integrated tabs along the sides to facilitate proper joint spacing. Get the right amount: Use this simple formula to determine the number of 4-by-8-inch pavers to order: Multiply the square footage of the project by 4.5. Order 10 percent more than this to account for cutting and breakage.
Brick classifications
ANY PAVER that meets ASTM standards will be classified by its ability to withstand freezing and abrasion as well as the installation method that should be used. These specs make it easy to determine if a paver can hold up to heavy vehicles or if it’s better suited for a patio. But this level of detail is often not included in a catalog, so you or your contractor will need to request the information from the supplier.
WEATHER
SX: Brick that may be frozen while saturated with water MX: Brick intended for exterior use with no freezing conditions NX: Brick intended for interior use with no freezing conditions
ABRASION
Type I: Brick subjected to extensive abrasion, such as public sidewalks and driveways Type II: Brick subjected to intermediate abrasion, such as residential walkways and driveways Type III: Brick subjected to low abrasions, such as patios in single-family homes
INTENDED INSTALLATION
Type R: Brick intended to be set in mortar and supported by a concrete base or a properly supported asphalt base Type F: Brick intended to be set in sand, with sand joints supported by a proper base
Runoff remedy: permeable brick pavers
Permeable brick pavers are made the same way as other brick pavers, except they have large lugs along the sides to ensure they’re spaced ¼ to ⅜ inches apart, allowing stormwater to pass through rather than collect on the surface. This makes them a smart choice for a pool deck, too. They require a porous base material known as open-graded aggregate that has pockets of empty space to facilitate drainage into the subsoil.
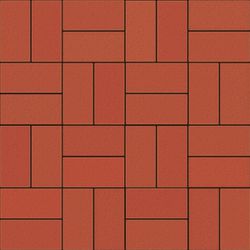
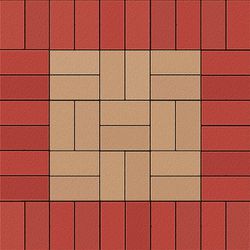
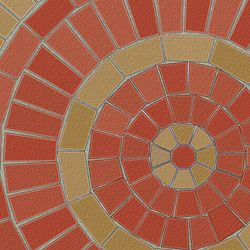
Brick Paver Laying Patterns
Some are quick and easy to install; others are complex designs that make the bricks’ surface even stronger.
Three Ways to Cut Bricks
1. Masonry blade (quick and precise)
Mark’s go-to method is to use a worm-drive circular saw or an angle grinder fitted with a diamond masonry blade. Be sure to wear a respirator to protect yourself from silica dust. Start by marking the cutline all around the brick with a square and pencil. Make a shallow cut, about ¼ inch deep, on the top, then increase the depth of the blade and make additional cuts to a depth of about 1 inch. Turn the brick over, and repeat the process. Tap off the waste end with a hammer, and then if necessary, clean the cut end with hammer taps on a cold chisel.
2. Wet saw (slower, but less dusty)
Readily available at most rental centers, a wet saw cuts fairly slowly, but it’s quiet, and the water-cooled blade keeps dust to a minimum.
3. Hammer, cold chisel, and brick set (good for small jobs)
This traditional, time-tested method is the slowest, and because it can be difficult to get a precise cut, it’s most appropriate for mortar-set installations. After marking your cut, use the hammer and cold chisel to score a shallow groove along the cutline, all the way around the brick. Now place the brick set on the groove with the blade’s bevel facing out and tap the set with the hammer to complete the cut.
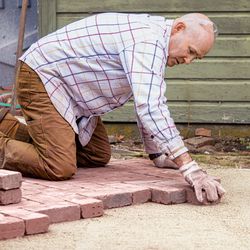
How to Lay Brick Pavers
Whether your project is a front walk, a back patio, or even a driveway, these basic steps still apply. Before starting a patio, walkway, or driveway project, decide whether to set the pavers in sand or mortar. Sand is more popular by far: It’s affordable, DIY-friendly, and longer lasting, as it allows the pavers to shift with the soil over time and through freeze-thaw cycles. Friction between the sand and the pavers locks the bricks together into a strong, flexible structure. Here are the basic installation steps:
When mortar is required
Front steps, and some walks and patios, call for mortar over concrete, a job best done by a pro. Bricks are laid in about 1 inch of mortar, then more mortar is used to fill the joints. TOH PRO TIP: “A herringbone pattern on a narrow walkway requires a lot of cuts. To eliminate some of them, I don’t use borders—I call it the ‘infinity look.’ Normally, a 4-foot-wide walk has an 8-inch border on each side. Leaving those out lets me continue the pattern so the cuts are right on the edge of the walkway and get covered with grass as it grows in.” – Mark Mccullough, This Old House Mason
:no_upscale()/cdn.vox-cdn.com/uploads/chorus_asset/file/23642609/0222_NB_All_About_Brick_Pavers_Brick_Pavers_03102022MR_0018.jpg)
:no_upscale()/cdn.vox-cdn.com/uploads/chorus_asset/file/23642621/0222_NB_All_About_Brick_Pavers_Drying_before_Firing.jpg)
:no_upscale()/cdn.vox-cdn.com/uploads/chorus_asset/file/23642649/0222_NB_All_About_Brick_Pavers_Brick_Pavers_03102022MR_0056.jpg)
:no_upscale()/cdn.vox-cdn.com/uploads/chorus_asset/file/23642866/0222_NB_All_About_Brick_Pavers_Brick_Pavers_03102022MR_0039.jpg)
:no_upscale()/cdn.vox-cdn.com/uploads/chorus_asset/file/23642707/0222_NB_All_About_Brick_Pavers_Brick_Pavers_03102022MR_0051.jpg)


:no_upscale()/cdn.vox-cdn.com/uploads/chorus_asset/file/23642933/0222_NB_All_About_Paving_Bricks__1__6.jpg)


:no_upscale()/cdn.vox-cdn.com/uploads/chorus_asset/file/23642880/0222_NB_All_About_Brick_Pavers_WestRoxbury_03142022_EL__128_Edit.jpg)
